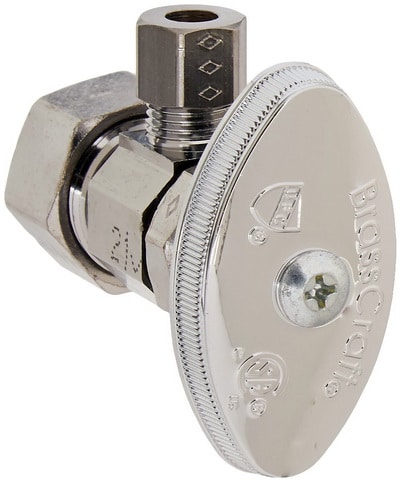
2. The electrical system is commonly grounded through the main water line, so by attaching the jumper cables, you create a path for the electricity to flow in the case of a short in the system. Copyright 2010 - 2019 Home-Repair-Central.com. Open the valve completely to keep the internal washer from melting. To saw it off, use a hacksaw to cut partially through the sleeve at an angle. We don't recommend the permanently installed supply tube version because you have to shut off the water and replace the entire unit if the supply tube ever needs replacement. If youre replacing a sweat valve, youll need a torch, flux, solder, emery cloth, wire brushes and a flame protection cloth to shield the wall. If the old sleeve left depression marks, locate the new sleeve slightly forward of the marks. While the goal is to quickly and easily remove and replace the main water shutoff valve, it's important to prepare the area to make the process as streamlined as possible. A compression valve typically consists of a threaded ball valve that is attached to a FIP fitting that can be soldered to copper pipe. Tom Silva shows how to install baseboard trim that become visual anchors for any room. Compression Inlet x 3/8 in. Be careful not to damage the pipe. Look for threads and hex flats where the steel pipe enters the valve. Once the curb stop valve is closed, head inside and test the water by turning on a faucet. Replace a sweat valve with another sweat valve or a compression valve. As soon as the solder melts, wipe away the excess solder with a damp rag. Clean the tubing with emery cloth. If the leak gets worse when you tighten it, then the washer is shot and will need to be replaced. They do make valve seat dressing tools that can be used to get the valve seat smooth again. Get the latest This Old House news, trusted tips, tricks, and DIY Smarts projects from our expertsstraight to your inbox. Install the new water shut-off valve. With the valve open and facing the correct direction, it's time for the blow torch. We recommend our users to update the browser. Do Not Sell My Personal Information CA Residents. They do not need to be tightened or open fully. Keep in mind that the first thing that needs to happen to replace the main water shutoff valve is that the water coming into the home needs to be shut down. Apply a wet towel to the pipe about 30 seconds to a minute after soldering to help cool down the pipe without interfering with the solder joint. Grab hold of the valve with pliers and use an adjustable wrench to tighten one of the valve's compression fittings onto one of the pipe ends. Use a second wrench to steady the valve if it wants to turn with the nut. Look for a hexagonal compression nut and matching hex flats on the body of the valve next to the compression nut.

Please call us at: 1-800-HOME-DEPOT (1-800-466-3337), Please enter in your email address in the following format: you@domain.com. Time: 45 minutes Grout is a crucial element of your tiling. If you have an older home with galvanized pipes, we suggest hiring a plumber to do the switch out.

This time there should be little to no water coming from the pipe while it's being cut. You can fix it yourself with these 28 tips for becoming a master plumber! Keep the seal between the valve and the pipe airtight by wrapping thread seal tape around the threads. There are several different types of valves, ranging from emergency shark bite valves to PEX pipe valves, but the most commonly used main shutoff valves are solder and compression valves. Push the nut away from the ferrule, then cut the ferrule with a hacksaw. However, it should be noted that debris from the inside of the pipes can clog faucet aerators, so it's advised to remove the faucet aerators before recharging the system, though this isn't mandatory. If removing a solder-type valve, cut the supply line with a. #HDGCN65D Onyx Black Semi-Gloss Exterior Paint HDGCN65DEX, WEED SNATCHER Crack and Crevice Weeding Tool WS1, Soldered connections are often marked by discolored. This ensures that the compression fitting can form a tight seal around the pipe. Do this at the closest, most accessible in-line shut-off valve that feeds it (if available) or at the main water supply valve. Next, remove the old compression sleeve and nut. If you are replacing the old supplies with new braided flexible lines, you will have to remove the old supplies from the faucets before you proceed. What Is the Optimal Temperature for a Greenhouse? Remove as much solder as possible, ensuring that the pipe is clean and smooth. You will know that the system is fully recharged when there is no longer air coming out of any plumbing fixtures in the home, including faucets, showerheads, and toilets. Check the new valves for leaks. Try to get a ball valve even if you currently have a gate valve. Repeat for the other pipe end. While a compression valve can be installed with a small amount of water coming through the line (or even with full water pressure), it's always better to have the water completely shut down if at all possible. The pipe will be copper or galvanized. Sorry to burst your bubble, but you need to stop believing these 10 plumbing myths ASAP! Install a new washer on the valve stem. You can buy specific sizes or packages that contain multiple sizes. At the end of the valve stem you will find a washer held in place by a screw. If done correctly, this will squeeze the thick, rubber washers that are inside these fittings, forming a watertight seal on the pipe. You can fix it yourself with these 28 tips for becoming a master plumber! Discuss possible options with the public works official to have the curb stop valve repaired before proceeding. Visually inspect the fittings for leaks, then turn off the valve, allowing pressure to build up on the inlet side of the main water shutoff valve. Check the inlet compression fitting for leaks by wiping it down with a paper towel.
Finish cutting the pipe, then move to the inlet side and repeat the process. A corroded or pitted seat will not allow even a new washer to shut off the water. Some have more than others. If installing a solder-type valve, clean the pipe with a sanding cloth. Most plumbing fixtures will have isolation valves located closer, so the main BCV is designed specifically for instances in which the water needs to be shut off for the entire home. It binds them together, protects them from chipping,, Time: 30 minutes to 1 hour Theres something exciting about getting snail mail, but your weather-worn mailbox deserves. Arrange these supplies so that they are within reach and neatly organized.

No leaks here, people. Thats the perfect amount to keep corrosion at bay. Slide off the old sleeve, old compression nut and the escutcheon (if you're going to replace it). Put on a leather glove and grab a damp cotton rag (microfiber cloth will melt). Then open a faucet on the lowest level of your house and another faucet on an upper level to drain the pipes. Check your progress and stop cutting before you reach the copper. Insert a flat-blade screwdriver into the cut and twist the screwdriver to break the sleeve.
Prepare the pipe for the new water shut-off valve. Since the seat is part of the main housing of the valve you are left with two choices if it is bad. The main challenge now will be finding a washer that is the same size as the one you have. Follow the instructions for the tool you purchased and dress in the seat. Let the water flow through the faucet to clear air in the lines. We've updated our Privacy Policy, which will go in to effect on September 1, 2022. Turn the water back on and see if your water shut off valve works. Though some water will still come out of the pipe when the old valve is removed, the amount should be significantly reduced. Even a drop of water will immediately show up on paper towel, so it's a great resource to ensure that there are no leaks in the new valve. This time there should be little to no water coming from the pipe while it's being cut. Use a small crescent wrench to tighten this nut if it starts to leak. Once the curb stop valve is closed, head inside and test the water by turning on a faucet. Too much heat will simply burn the paste and make it more difficult to get the desired result. However, to avoid soldering, the valve can be connected to two compression fittings on either side of the valve. If installing a push-to-connect type valve, press it squarely and evenly onto the pipe until it bottoms out. Lay down the drop cloth and set up the bucket underneath the valve with a towel nearby. They rarely lock up, leak or wear out and best of all, they'll take just an hour or so to install. If installing a thread-style valve, thread the valve onto the pipe and hand tighten. Close the new valve.

Grooved, partially disintegrated? Slip new stop-and-waste valve into place between the just-cut pipe ends.

Local store prices may vary from those displayed. Most push-fit valves require at least 1 in. If working on a hot water supply line, its a good idea to turn gas water heaters to the pilot setting and turn off electric water heaters. Timothy Dale is a home repair expert and writer with over a decade of hands-on construction and home improvement experience. If your tubing will work, shop for a valve that meets your configuration needs (straight or angled).
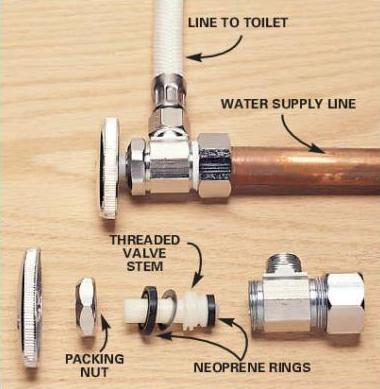
Once you identify the connection type, buy a quarter-turn shutoff ball valve to match the size of the incoming copper pipe and the size of the supply tube connection. Remove the old water shut-off valve. This is why an old, worn-out main shutoff valve needs to be replaced. Determine whether the valve to be replaced is connected to the pipe using solder, a compression fitting or threaded fitting.

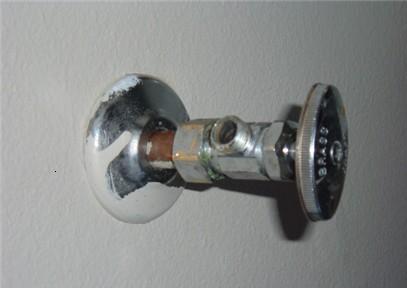
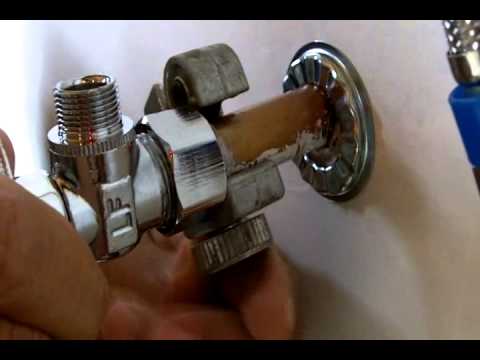
Adjust the valve to make sure that the compression fitting is completely over the pipe, then begin to hand-tighten the compression nut. A sweat shutoff valve doesnt have any hex flats where the copper tubing enters from the wall. Examine the portion of the valve closest to the wall. Learn how to test and replace your main water shut-off valve before you need to use it. Take the towel and clean the pipe to remove any dust or debris, then use the grit cloth to scrape off the top layer of oxidized metal material, revealing clean copper pipe. By turning off this isolation valve, you don't need to drain the entire water line. If your stub-out tubing is perfectly symmetrical, long enough and has a square-cut end, you might be able to use a push-fit valve to replace your old compression or sweat valve. A threaded connection is marked by visible threads where the fitting connects to the pipe. All Rights Reserved. Do not over-tighten. Open the faucet that is closest to the main water shutoff valve to drain the water line. Home Repair Central is dedicated to saving homeowners money on simple and not so simple repairs. You will also want to use a wire pipe brush to clean the inside of the new valve, then apply flux paste to the inside of the valve. The water will slowly begin to pour out of the faucet, pushing air out of the system.
:max_bytes(150000):strip_icc()/threaded_shut_off_valve-56a73bfc3df78cf77293860f.jpg)
Speak to the public works official to turn the water off or operate the curb key on your own, if you have permission and the experience. It will slowly liquefy and flow into the gap between the pipe and the valve, forming a metal seal. Shut the water off to the fixture. Find your main water shut-off valve. This method is commonly used by plumbing professionals to prevent cutting the pipe when there isn't a lot of pipe coming out of the foundation, but if you have enough space, then cutting the pipe on both sides is a cleaner and easier way to remove the old valve. One on the valve itself and one on the nut. As noted above, the water should initially come out at a normal rate, then taper off before stopping entirely. Apply flux paste to the exterior of the pipe to prepare it for soldering. Examine the seat and see if it is smooth. Expert Tips for an Easy Faucet Installation. When the valve is in place and the compression fittings are adequately tightened, have the public works official or plumber slowly turn on the water. Replacing Solder Main Water Shutoff Valves, Arrange to Have the Water Shut Down at the Street, Replacing Compression Main Shutoff Valves, Install the Main Water Shutoff Compression Valve, 7 Types of Water Shutoff Valves You Should Know About, How to Shut Off the Main Water Supply in a Mobile Home, How to Turn off the Water for Plumbing Repairs, How to Replace a Leaking Water Heater Drain Valve, A Step-by-Step Guide to De-Winterizing a House, Removing a Bathroom Vanity Cabinet, Sink, and Faucet, How to Find Your Home's Main Water Shut Off Valve. Is your valve soldered in place? The water should flow into the system and begin pouring out of the nearby open faucet. So measure the length of the stub-out and refer to the valve manufacturer's length requirements before buying. Dont fret. You can cut the pipe with a tubing cutter or hacksaw just cut as close to the compression nut as possible. If no leaks are detected, then the curb stop valve can be left fully open.

Next, heat the fitting using the propane torch. This will over-compress the ferrule. To begin, drape the flame protection cloth over the copper tubing and tape it to the wall. The valve should now slide right off the pipe. This guide reviews the different methods for how to remove and install shut-off valves on copper supply lines. This Old House plumbing and heating contractor Richard Trethewey shows how to replace an old, corroded water-supply valvewithout soldering. Grab a cloth and clean them thoroughly to remove any residue. 2000-2022 Home Depot. You will know that the system is fully recharged when there is no longer air coming out of any plumbing fixtures in the home, including faucets, showerheads, and toilets. The washer is the rubber (usually) disk that compresses to shut off the water. Head over to your local hardware store and grab a replacement valve. Signs that the valve is no longer working the way it should include the inability of the valve to fully shut off the flow of water, a seized or difficult-to-turn valve handle, and an active leak from the valve. Clean the inside of the valve with the sanding cloth as well. If installing a push-to-connect type valve, clean the pipe with the sanding cloth, ensuring that the pipe is clean and smooth. Hopefully your water shut off valve works as intended and shuts the water off. If no leaks are detected, then open the valve and test the outlet compression fitting. We're sorry, but there's been error submitting your information. Remove the washer using a screwdriver and find one that matches. With this in mind, these steps for replacing the main water shutoff valve are separated into two common valve type categories to provide clear, concise steps for dealing with both solder and compression valves.

By turning off this isolation valve, you don't need to drain the entire water line. This is the first step in learning how to replace water shut-off valves.

Once the ferrule is cut, use a flat-head screwdriver to pry it loose from the pipe. Head to the sink that is closest to the main water shutoff valve and open the faucet to drain the water line. Hold the valve with a wrench or a pliers and tighten the nut a one-half to three-quarters turn (follow the manufacturer's tightening instructions).
Otherwise, remove enough old solder to allow the new sweat valve to slide onto the tubing. There is a nut on the base of the handle stem that holds the stem and washer assembly in place. He is skilled in residential, commercial, industrial and institutional plumbing, electrical, carpentry, installation, renovations, and project management. Check for signs of corrosion. If the first solder is successful, then it's time to finish the job. Before you do any torch work, make sure there's a fire extinguisher nearby and safeguard the wall with a flame protection cloth. If you're replacing a sweat valve with a compression valve, sand off all traces of solder before adding the new escutcheon, nut and sleeve. If installing a thread-type valve, remove any existing thread seal tape from the threads and clean them using a wire brush. Shut off the water at the main shutoff valve. When the flux begins to bubble, apply the solder at the joint. Ball valves are less prone to leaks and they last longer. By closing an operational water shutoff valve, you can stop the flow of water from the municipal water system or well system. This valve can be replaced using a compression-type or push-to-connect type valve. Keep in mind that some homes have an isolation valve located just a few feet away from the main water shutoff valve. The valve seat is a flat machined area in the valve that the washer presses against when closed. No one wants to think about plumbing gone wrong, but toilets clog and so do sinks. Need Help? Hold the valve with a pliers, loosen the packing nut and unscrew the entire valve stem. Expect some water to come out and fall into the bucket. Compression Outlet 1/4-Turn Angle Valve, Home Decorators Collection The Stupell Home Decor Collection, Southern Enterprises Vellats Woven Water Hyacinth Natural Finish Wall Art (Set of 3) HD597126, Fully Bonded Adhesive Lumber & Composites, 1/4 in x 8 in Square Edge Hardwood Boards, nuLOOM Glendora Chevron Ivory 5 ft. x 8 ft. Area Rug, Commercial Electric White 1-Gang Ethernet Wall Plate (1-Pack) 216 8C, Glidden Essentials 5 gal. However, if this solder joint is leaking, the water will need to be shut down again and the joint will need to be re-soldered. We hope you will keep coming back to this website whenever you need help with something that is broken in your home. Next, screw the compression nut onto the valve until snug. Some cities will allow you to operate this valve, but this isn't often the case, because the curb stop valve is typically owned by the city or municipality. Before you can remove this nut you need to shut the water off to the valve. Replacing the washers is an option when a valve starts to leak. If you have an older house, youre more likely to see a knob (gate valve); newer houses are more likely to have a lever (ball valve). With the new valve installed and leak-free, you can recharge the plumbing system by turning on the water and opening nearby faucets. If the valve has a compression nut but no hex flats, look for two flats on the sides of the valve body. It is possible that you will have to shut off the main water supply valve. Unroll a portion of solder and slowly apply heat to the inlet side of the new valve. Unscrewing the old valve and screwing on a new one may seem easy enough. Prepare the work area to make the process as streamlined as possible by gathering the necessary tools and supplies and organizing them neatly within reach. Just make sure to inspect the compression fittings before reinstallation, as the internal components may have been damaged during the initial installation and will need to be replaced before proceeding. Ta-da! They're a good alternative to sweat and compression fittings if you have enough tubing projecting out from the wall and if that tubing is in good shape. Next, apply flux to the fitting and the joint. Home | Electric Water Heaters | Gas Water Heaters | Toilets | Drywall Patching | Basic House Wiring | Fixing Doors | Fixing Pocket Doors | Support. Slide the new escutcheon and compression nut onto the copper tubing. The fitting type is an internal mechanism that ensures a water-tight seal and can only be removed using a special tool. See any white, turquoise, or brown residue on the outside of the valve? Keep in mind that if you used an isolation valve, then there will be much less water to drain in the case of a leak. Have them slowly turn on the water at the curb stop while the new valve is in the open position. This could crack the valve or damage the threads. Use a pipe wrench to secure the pipe and tighten the valve using an adjustable wrench. Peek inside and remove the old washer if it's stuck on the seat. By submitting your email, you agree to our. Many washer kits come with new screws. Some homes have an isolation valve located near the main water shutoff valve.

Sign up for our newsletter!

Double-check that the jumper cables, drop cloth, bucket, and towel are all in place, then use the pipe cutter to start cutting through the pipe on the outlet side of the valve.
Connect the supply tube and test for leaks. Tighten the nut until the fit on the pipe is snug and the compression fitting can no longer be moved or pulled off the pipe. Attach the jumper cables to the pipe on either side of the valve to create a path for the electricity to flow in the case of a short in the system. Alternatively, the valve can be 'sweated' off by applying constant heat with the blowtorch in order to melt the old solder joints, allowing the valve to be removed with a set of channel locks, though this method is only recommended for individuals with soldering experience. We are no longer supporting IE (Internet Explorer) as we strive to provide site experiences for browsers that support new web standards and security practices. Before installing a push-fit valve, remove any burrs from the open end. With the flame protection cloth in place, heat the valve just enough to draw in the solder. Sorry to burst your bubble, but you need to stop believing these 10 plumbing myths ASAP! Get daily tips and tricks for making your best home. As soon as the solder melts, twist and pull the valve off the copper tubing with a pliers. We suggest replacing it it's easier than cleaning.

Shut-off valves, also called supply stop valves, allow people to connect supply lines to sinks and toilets. Check for leaks by feeling the fittings by hand or using a paper towel.
Sitemap 4